


A single witness statement can shift the outcome of an entire personal injury case. It can confirm who caused an accident, establish the severity of injuries, and fill in gaps that police reports and medical records leave behind. But a poorly written one, vague, disorganized, or missing critical facts, can do more harm than good. Understanding what should be included in a witness statement matters whether you’re the person who saw a crash happen, a bystander at a slip-and-fall, or the injured party documenting your own account.
At Steven M. Sweat, Personal Injury Lawyers, APC, we’ve spent over 25 years handling accident and injury cases across Los Angeles and throughout California. Our attorneys have reviewed thousands of witness statements, the strong ones that helped secure settlements and the weak ones that insurance adjusters picked apart. That experience is exactly why we put this guide together: to give you a practical, straightforward resource you can actually use.
Below, you’ll find a complete breakdown of every element a witness statement needs to be clear, credible, and useful in a legal proceeding. We cover the essential facts, proper formatting, common mistakes to avoid, and a ready-to-use checklist so nothing gets left out. Whether you’re preparing a statement for a car accident claim, a workplace injury, or any other incident, this guide walks you through each step from start to finish.
What a witness statement is and how it’s used
A witness statement is a written account of what a person directly observed before, during, or after an incident. It differs from a police report because it comes from an individual’s own perspective and uses their own words. Courts, insurance companies, employers, and investigators all rely on witness statements to reconstruct events when no video footage or physical evidence tells the complete story. The statement does not need to come from a stranger. It can be written by the injured party, a passenger in a vehicle, a coworker, a neighbor, or anyone else with relevant firsthand knowledge.
The definition and what it covers
A witness statement captures the facts a person personally observed, not what they heard secondhand or assumed. It answers the core questions: who was involved, what happened, when and where it occurred, and what conditions were present at the time. In a personal injury context, this could mean describing road conditions at the moment of a collision, the layout of a floor where someone slipped, or the behavior of a driver before impact. A strong statement stays close to direct sensory experience: what you saw, heard, felt, or smelled at the scene.
A witness statement is only as useful as it is specific. Vague language like “the car was going fast” carries far less weight than “the vehicle passed through the intersection without slowing, despite the red traffic signal.”
Understanding what should be included in a witness statement starts with recognizing that it functions as a legal document, even when written informally. Every word you put in it can be read by an attorney, an insurance adjuster, or a judge, so precision matters from the first sentence.
Where statements get submitted and reviewed
Witness statements travel through several different channels depending on the type of case. In a personal injury lawsuit, your attorney may use a statement to support a demand letter to the at-fault party’s insurer or to prepare for trial depositions. In a workers’ compensation claim, an employer or state agency will review the statement to determine whether the injury happened within the scope of employment. During insurance investigations, adjusters compare witness statements against medical records, accident reports, and physical evidence to identify inconsistencies.
Statements also carry real weight during settlement negotiations. A well-organized account from a credible witness can push an insurer to settle rather than risk a jury hearing from that same person in court. On the other hand, a statement full of contradictions or missing details gives the opposing side a reason to reduce or deny a claim entirely.
Below is a quick breakdown of where your statement is likely to go and who will read it:
| Setting | Who Reviews It | Primary Purpose |
|---|---|---|
| Insurance claim | Adjusters and defense attorneys | Verify facts, identify gaps or contradictions |
| Personal injury lawsuit | Plaintiff’s and defense attorneys, judge | Support or challenge liability arguments |
| Workers’ compensation | Employer, state agency, hearing officer | Confirm injury occurred during employment |
| Workplace investigation | HR, compliance officers, legal counsel | Establish a factual record of the incident |
| Criminal proceeding | Prosecutor, defense, jury | Corroborate or dispute witness testimony |
Who can write a witness statement
Any person with direct, firsthand knowledge of the incident can write a witness statement. This includes the injured party, bystanders, passengers, coworkers, neighbors, and in some cases, first responders who arrived at the scene. Each writer must limit their account to what they personally observed. A statement written by someone relaying what a third party told them carries little to no legal weight and can undermine the credibility of other evidence already on record.
If you were injured in an accident, your own statement matters. You experienced the event, and your documented account creates a contemporaneous record that can hold up against an insurance company’s version of events months or even years later. Writing your account promptly, while details remain fresh, is one of the most protective steps you can take for your own claim.
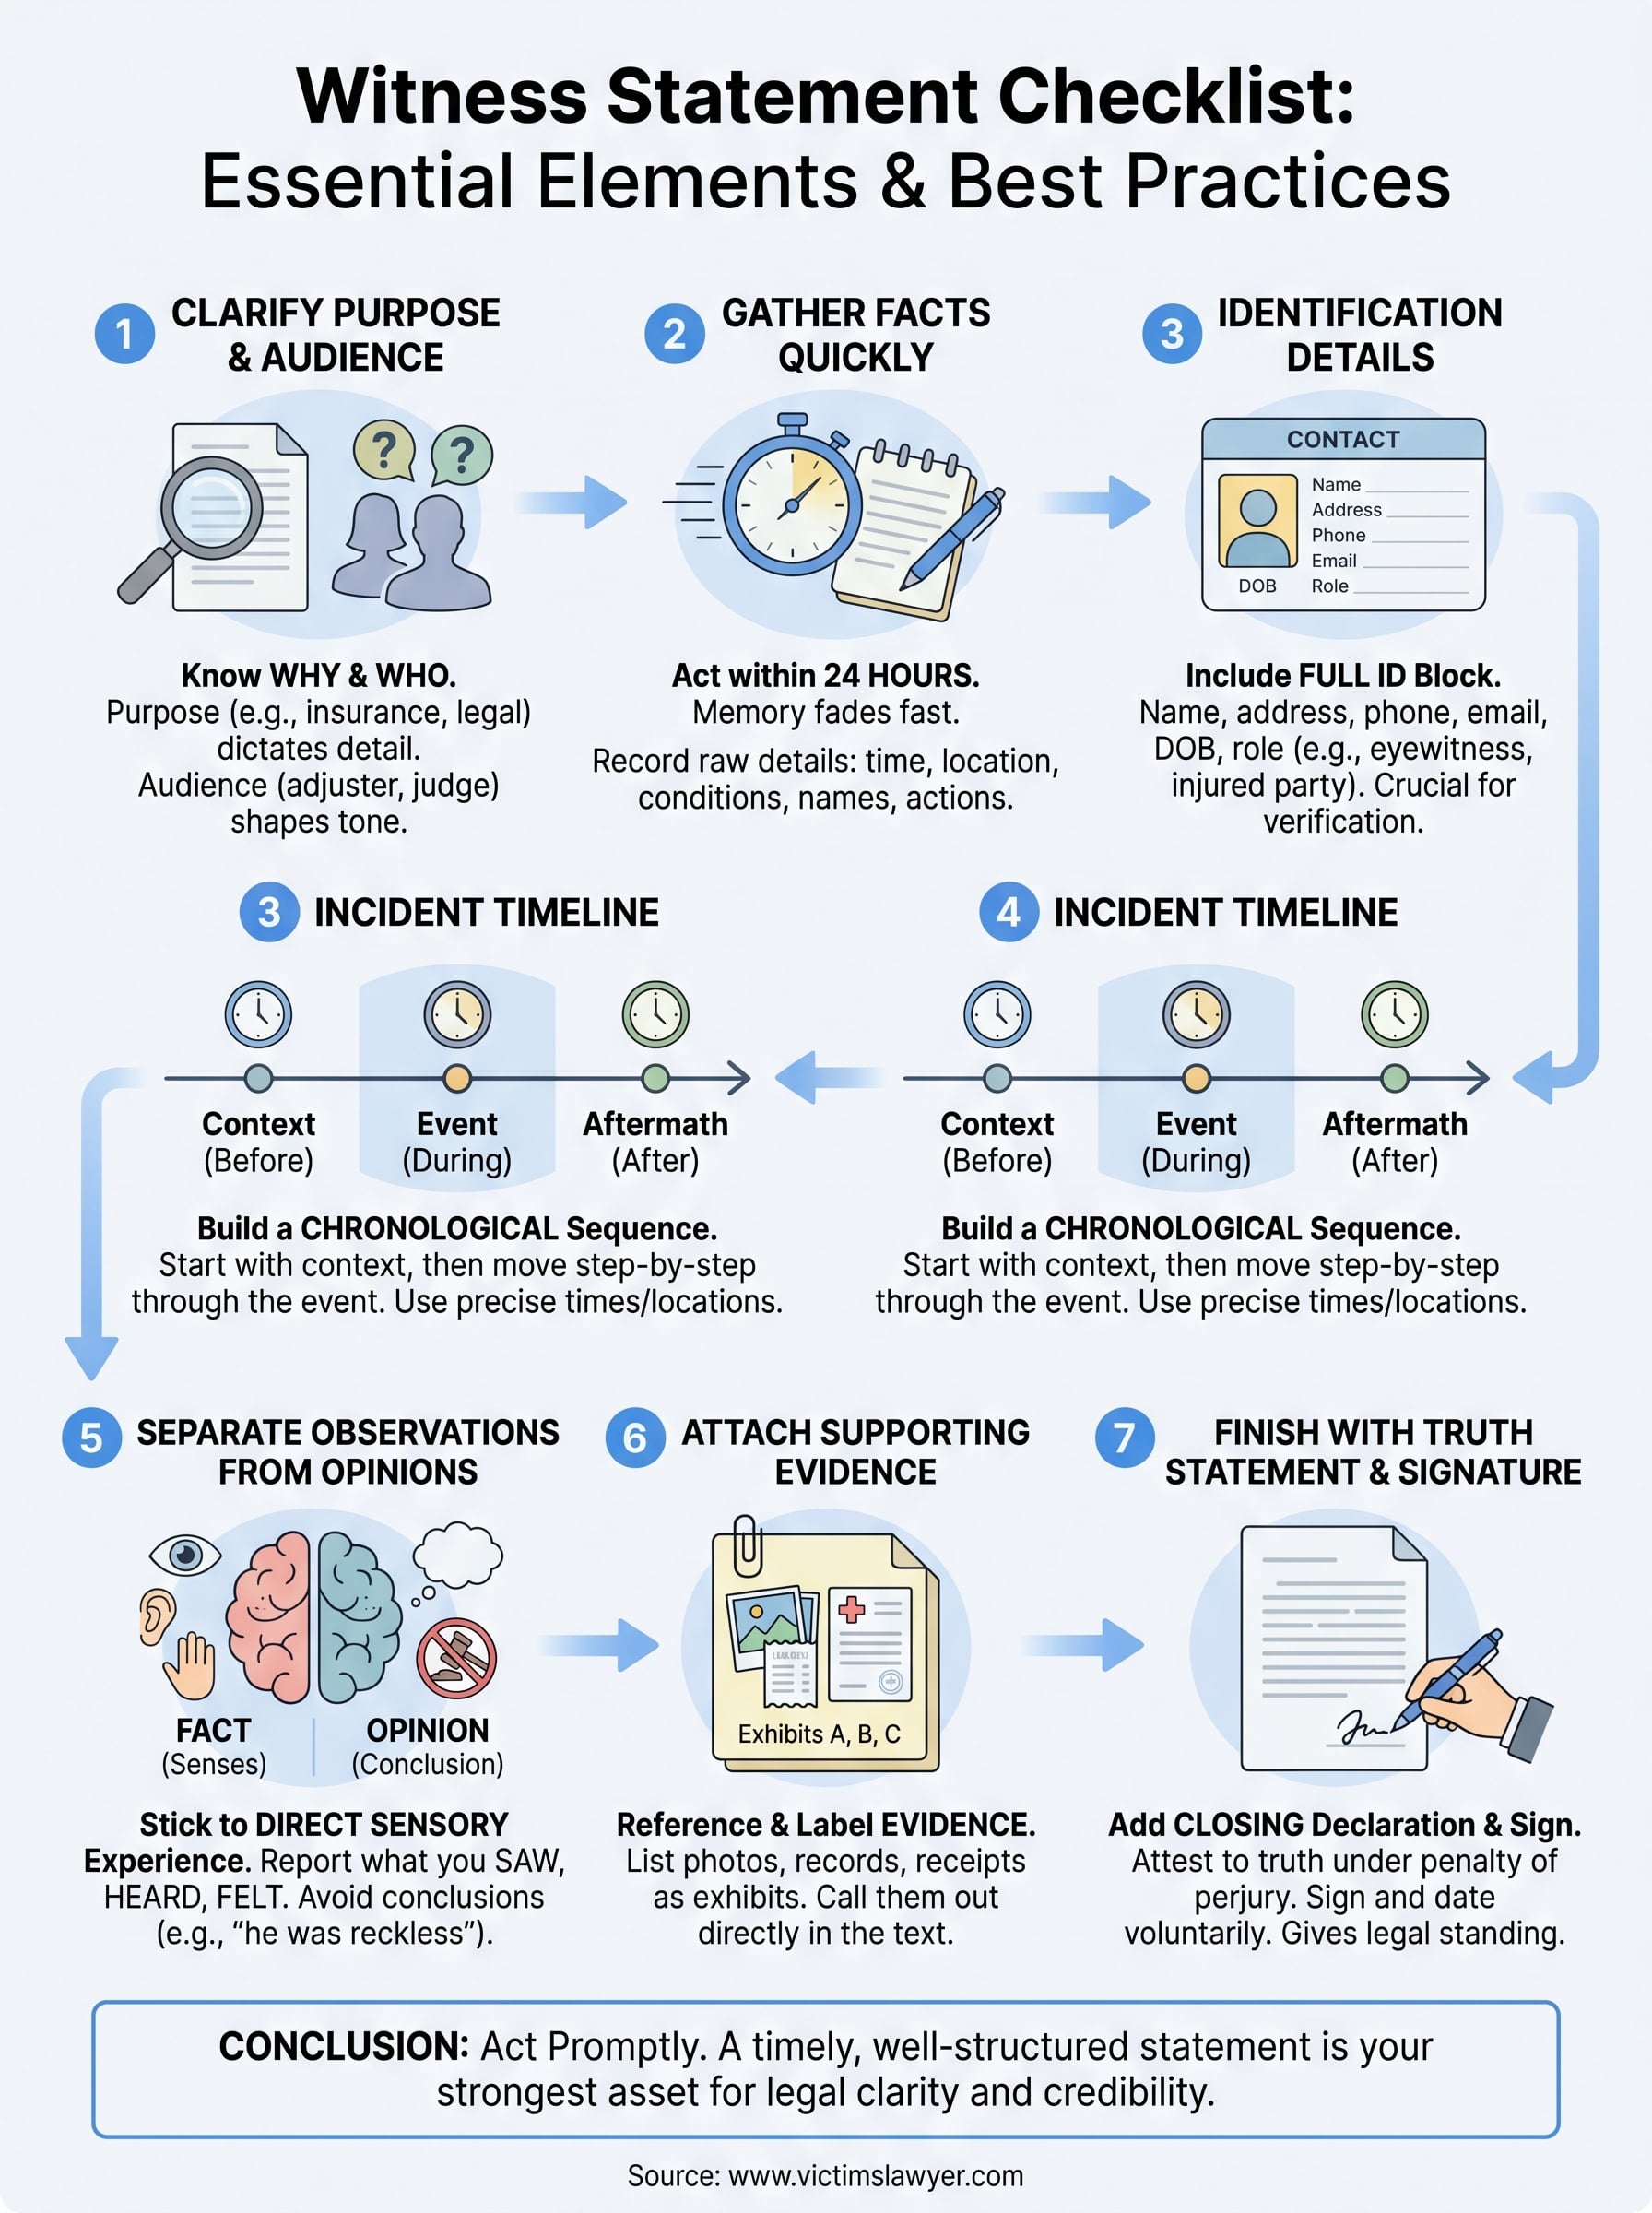
Step 1. Clarify purpose and who will read it
Before you write a single word, you need to know why the statement exists and who will read it. That decision shapes everything: the level of detail you include, the language you use, and the structure you follow. A statement submitted to an insurance adjuster needs to anticipate skeptical, line-by-line scrutiny. A statement prepared for an internal HR investigation serves a different function entirely. Starting without this clarity leads to statements that either overwhelm the reader with irrelevant detail or leave out the specifics that actually matter.
Identify the purpose of your statement
Your first task is to write down the specific reason the statement is being requested. Is it part of a personal injury insurance claim, a workers’ compensation filing, a civil lawsuit, or a workplace misconduct investigation? Each of these demands a different emphasis. In a car accident claim, the insurer wants to know the exact sequence of events and road conditions. In an employment dispute, HR wants to know what was said, who was present, and when it happened.
Writing a statement without knowing its destination is like giving directions without knowing someone’s starting point: you’ll leave out the most important parts.
Here are the most common purposes and what each one emphasizes:
- Insurance claim: Sequence of events, physical conditions, and any statements made at the scene
- Personal injury lawsuit: Liability, causation, and the extent of observable injuries or damages
- Workers’ compensation: Location of injury, job duties being performed, and any safety violations
- HR or workplace investigation: Specific conduct, direct quotes, dates, and the names of everyone present
- Criminal proceeding: Chronological facts, physical descriptions, and any threats or admissions observed
Know your audience before you write
Once you know the purpose, identify the specific person or group who will review your statement first. An insurance adjuster reads dozens of statements a week and looks for gaps or inconsistencies. A judge expects organized, factual language with no emotional editorializing. An HR officer needs a clear, professional account that connects the facts to the relevant workplace policies.
Knowing what each audience prioritizes helps you decide what level of detail is appropriate and where to focus your account. Thinking through what should be included in a witness statement becomes much easier once you understand who will use it and for what purpose. Adjust your language to be direct and clear, avoid loaded or defensive phrasing, and focus on what you personally observed rather than what you believe or feel happened.
Step 2. Gather facts and record them quickly
Speed matters more than polish at this stage. Memory degrades fast, and the details you capture in the first hour after an incident are far more reliable than anything you try to reconstruct days later. Before you worry about format or legal language, your priority is to lock in every factual detail while it’s still vivid. Thinking through what should be included in a witness statement becomes much simpler once you have a raw set of accurate notes to draw from.
The difference between a strong statement and a weak one often comes down to when the notes were taken, not how well they were written.
Act within the first 24 hours
Your memory of an event begins to fade and distort almost immediately, especially under stress. Research on eyewitness memory consistently shows that people fill in gaps unconsciously, meaning you may later “remember” details that you actually inferred rather than observed. Recording your account within the first 24 hours gives you the most accurate raw material to work with.
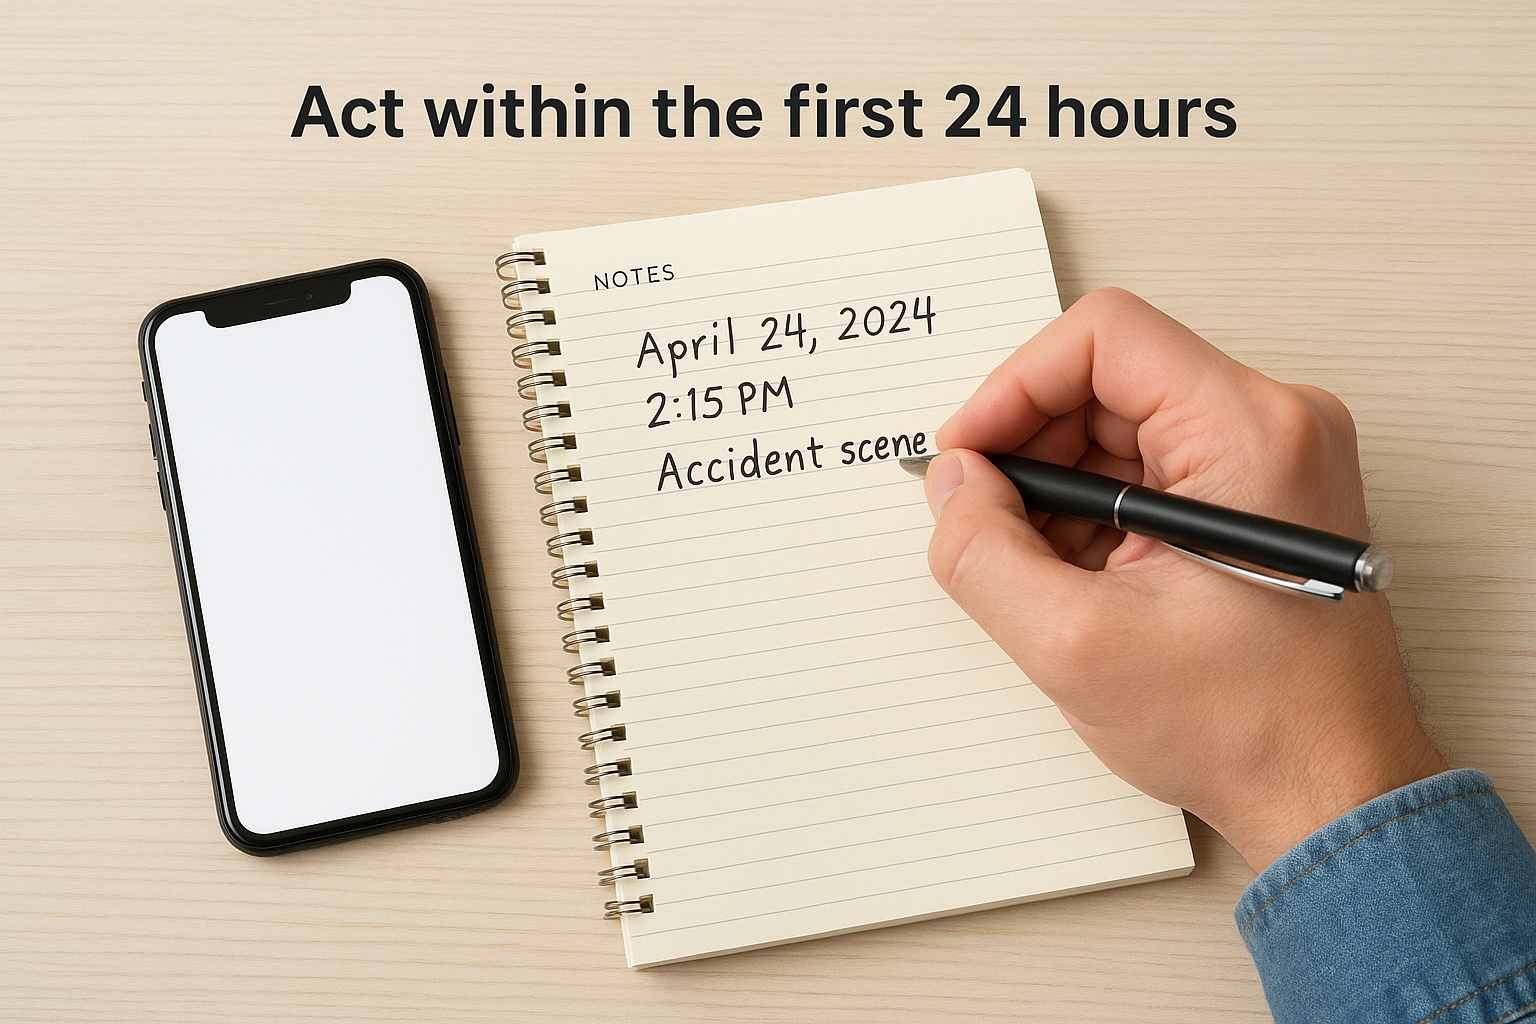
Start by writing down everything you remember, even if it seems minor. You can cut irrelevant details later, but you cannot recover details you never wrote down. Use your phone’s notes app, a voice memo, or a blank piece of paper: the medium does not matter at this stage. What matters is capturing your honest, unfiltered recollection before it changes.
Use this quick checklist to make sure your initial notes cover the right ground:
- Date, time, and exact location of the incident
- Weather, lighting, and road or surface conditions at the scene
- Names and contact information of anyone else present
- Physical descriptions of vehicles, people, or objects involved
- Any statements made out loud by the people involved
- Your position relative to the incident when you observed it
- Any actions you took immediately after the event
Use a simple field notes format
Once you have your raw details, organize them into a short field notes format before you move into the formal statement. This keeps your facts separate from your interpretations and makes the drafting process much faster. Write each observation as a single, short sentence tied to a specific moment: “At approximately 2:15 p.m., the blue sedan ran through the red light at the intersection of Main and 5th.”
This sentence-by-sentence approach forces precision and prevents you from accidentally blending what you saw with what you assumed. When you later draft the full statement, these notes become your factual backbone.
Step 3. Start with the required ID details
Every formal witness statement opens with a block of identification information that tells the reader exactly who wrote it and how to reach them. This section comes before you describe the incident itself, and it serves a specific function: it establishes your identity on the record and gives attorneys, adjusters, or investigators the contact details they need if they have follow-up questions. Skipping this block or filling it in incompletely can delay the review process and, in some cases, make the statement unusable in a formal proceeding.
Your ID block is not a formality. It is the foundation that makes everything else in your statement verifiable.
What identification details to include
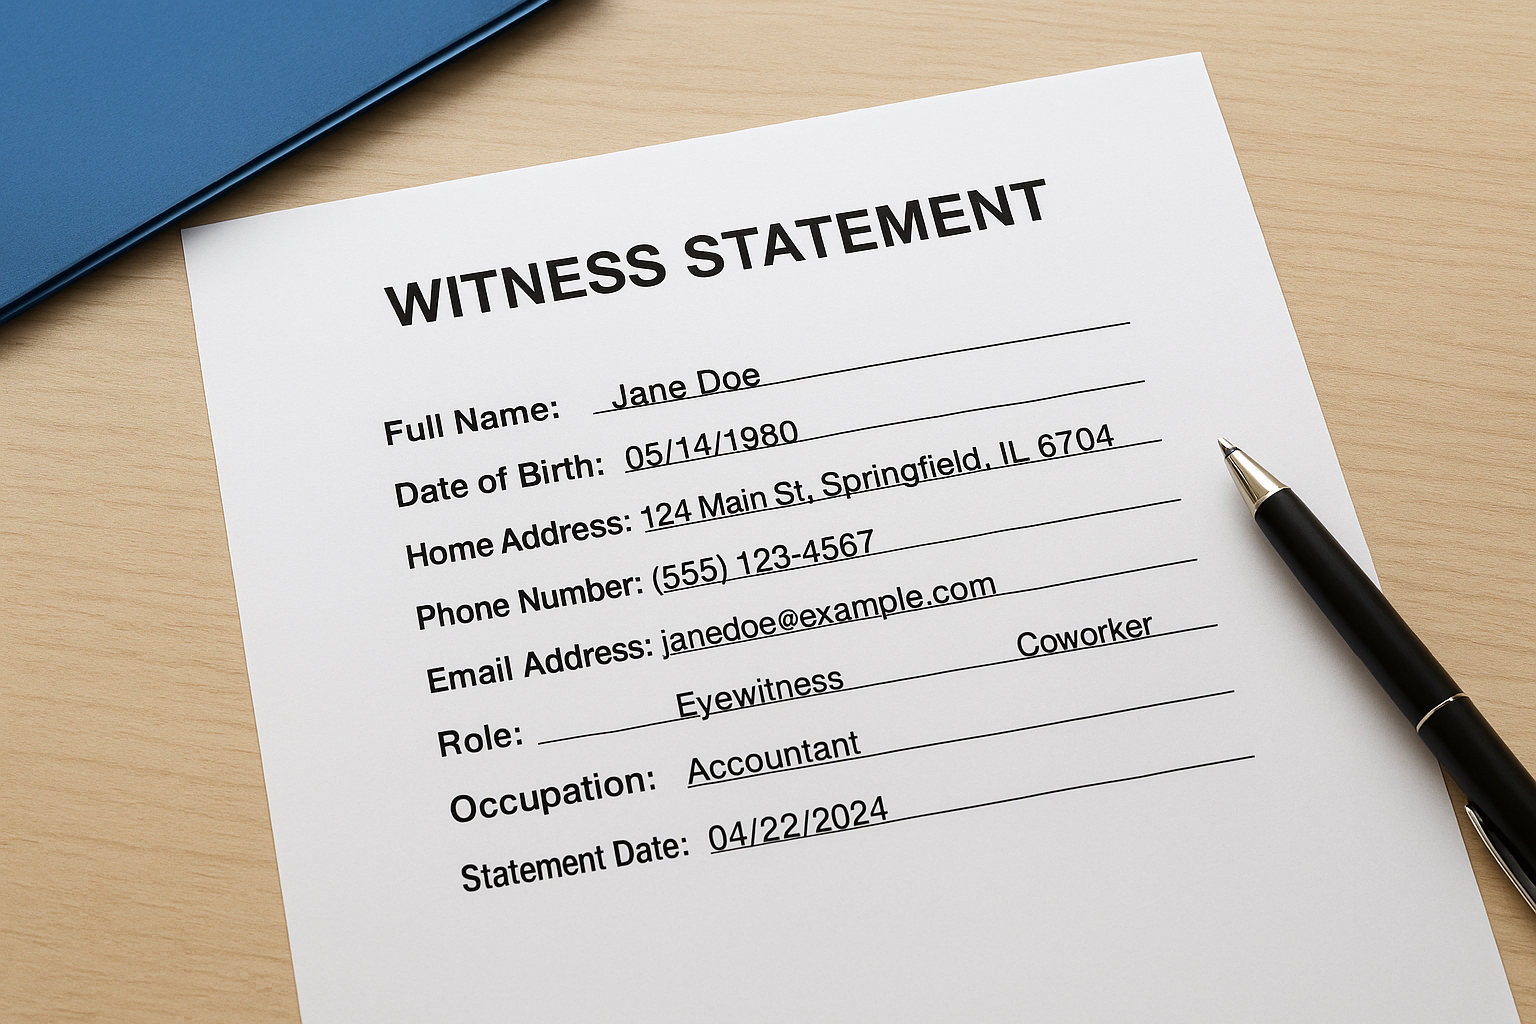
When thinking through what should be included in a witness statement, the opening ID block is non-negotiable. Every statement needs your full legal name, your current home address, your phone number, and your email address. Beyond basic contact information, you also need to state your relationship to the incident: whether you were a direct participant, a bystander, a coworker, or another category entirely. That relationship tells the reader immediately how much weight to give your account.
Include each of the following in your ID block:
- Full legal name (first, middle initial, last)
- Current home address (street, city, state, zip code)
- Phone number and email address
- Date of birth (required in most legal and insurance contexts)
- Your role or relationship to the incident (eyewitness, injured party, employer, coworker, etc.)
- Occupation if it is relevant to how you observed the incident
How to format your ID block
Your ID block should appear at the very top of your statement, before any description of the incident. Keep each field on its own line so the information is easy to scan. Below is a simple template you can copy and fill in directly:
WITNESS STATEMENT

Full Name:       [First Name] [M.I.] [Last Name]
Date of Birth:   [MM/DD/YYYY]
Home Address:    [Street Address, City, State, ZIP]
Phone Number:    [XXX-XXX-XXXX]
Email Address:   [your@email.com]
Role:            [Eyewitness / Injured Party / Coworker / Other]
Occupation:      [Your job title or profession]
Statement Date:  [MM/DD/YYYY]
Fill in this block completely and accurately before you move on to the incident details. Any mismatch between what you write here and what appears on official records, such as a driver’s license or medical intake form, can raise unnecessary questions about your credibility before the reader even reaches your account of what happened.
Step 4. Write the incident timeline clearly
The body of your statement lives or dies on how clearly you present the sequence of events. A jumbled account that skips back and forth between moments confuses the reader and makes your statement harder to rely on. Attorneys, adjusters, and investigators need to follow exactly what happened, in the order it happened. When you think about what should be included in a witness statement, a clean, chronological timeline is the single element that does the most work.
Build your timeline in chronological order
Start from the moment you first became aware that something was happening, not from the moment of impact or injury. That setup context matters. It tells the reader where you were, what you were doing, and what drew your attention to the incident. From there, walk forward in time, one moment at a time, until the scene came to a stop or you left.

A timeline that starts at the beginning and moves forward without jumping around is far easier for a jury or adjuster to trust than one that circles back to fill in missed details.
Below is a simple timeline template you can follow directly:
INCIDENT TIMELINE

[Time 1]: Describe your location and what you were doing immediately before the incident.
[Time 2]: Describe what first caught your attention (a sound, movement, or visual cue).
[Time 3]: Describe exactly what you observed as the incident occurred.
[Time 4]: Describe what happened immediately after impact or the triggering event.
[Time 5]: Describe any actions taken at the scene and when you left or stopped observing.
Fill in each slot with one to two factual sentences tied to a specific time or moment. Keep each entry focused on a single observation.
Use precise language for time and location
Vague time references like “later” or “shortly after” create gaps that the opposing side will exploit. Whenever possible, anchor each entry to a specific time using your phone, a clock you saw at the scene, or your best estimate stated clearly as an estimate. An honest “approximately 3:45 p.m.” is far stronger than a vague “mid-afternoon.”
Apply the same precision to location. Instead of “near the parking lot,” write “at the northeast entrance of the parking structure on the corner of Sunset Boulevard and Vine Street.” Specific details remove ambiguity and protect your account from being reinterpreted. Use landmarks, street names, lane positions, and distances whenever you can recall them accurately.
Step 5. Separate observations from opinions
One of the most damaging mistakes a witness can make is mixing personal conclusions into a factual account. When you think about what should be included in a witness statement, the answer is always direct observations, not interpretations. Statements built on opinions give defense attorneys an easy target, and insurance adjusters use them to chip away at your credibility before any other evidence gets reviewed. Keeping the two separate is a discipline, and it requires you to constantly ask yourself one question: did I see this, or did I conclude it?
Why the distinction matters legally
Opinion language signals to the reader that you are guessing, not reporting. Phrases like “he must have been drunk” or “she was clearly reckless” are conclusions, not facts. An adjuster or opposing attorney will immediately flag those as unsupported assertions and use them to question everything else in your statement. Courts expect witnesses to report what they directly perceived through their senses, not what they believe was true in the broader picture.
Your statement carries the most weight when every sentence describes something you personally saw, heard, felt, or smelled, with nothing added beyond what your senses actually captured.
The legal standard in California civil cases requires witness testimony to be based on personal knowledge, not inference. That same standard applies to written statements submitted to insurers and employers. When you anchor each sentence to a direct sensory experience, you give your account a foundation that is much harder to challenge.
How to rewrite opinion into observation
The fix is straightforward: identify any conclusion you wrote and replace it with the specific sensory detail that led you to that conclusion. Do not say the driver seemed distracted. Write that the driver was looking down at a device in their right hand and did not apply the brakes before impact. The fact does the work the opinion was trying to do, but without the vulnerability.
Below are direct side-by-side examples that show how to make this correction:
| Opinion Language | Observation Language |
|---|---|
| “The driver was going way too fast.” | “The vehicle did not slow before impact and left approximately 40 feet of skid marks on the pavement.” |
| “She was clearly in pain.” | “She was holding her right arm against her chest and could not lift it above shoulder height.” |
| “The floor was dangerously slippery.” | “My foot slid approximately 12 inches on the tile surface before I fell.” |
| “He seemed angry.” | “He raised his voice and struck the hood of the vehicle with his open hand.” |
Replace every opinion in your draft with the observable detail behind it before you submit the statement.
Step 6. Attach and reference supporting evidence
A witness statement becomes significantly stronger when it connects directly to physical proof. Photographs, videos, medical records, and receipts do not replace your written account, but they confirm and extend it. When thinking through what should be included in a witness statement, supporting evidence is the element most people forget to organize properly. Your statement should not just mention that evidence exists: it should identify each item by name, tell the reader what it shows, and label it so the reviewer can match every reference in your text to the correct document.
A statement that points to specific, labeled exhibits is far harder to dismiss than one that vaguely references photos or records without explaining what they contain.
List every piece of evidence you’re attaching
Before you finalize your statement, collect every item of supporting evidence you have access to and create a numbered exhibit list. This list goes at the end of your statement, just before your signature block. Each exhibit gets a label (Exhibit A, Exhibit B, and so on) and a short description of what it contains. Below is a template you can use directly:
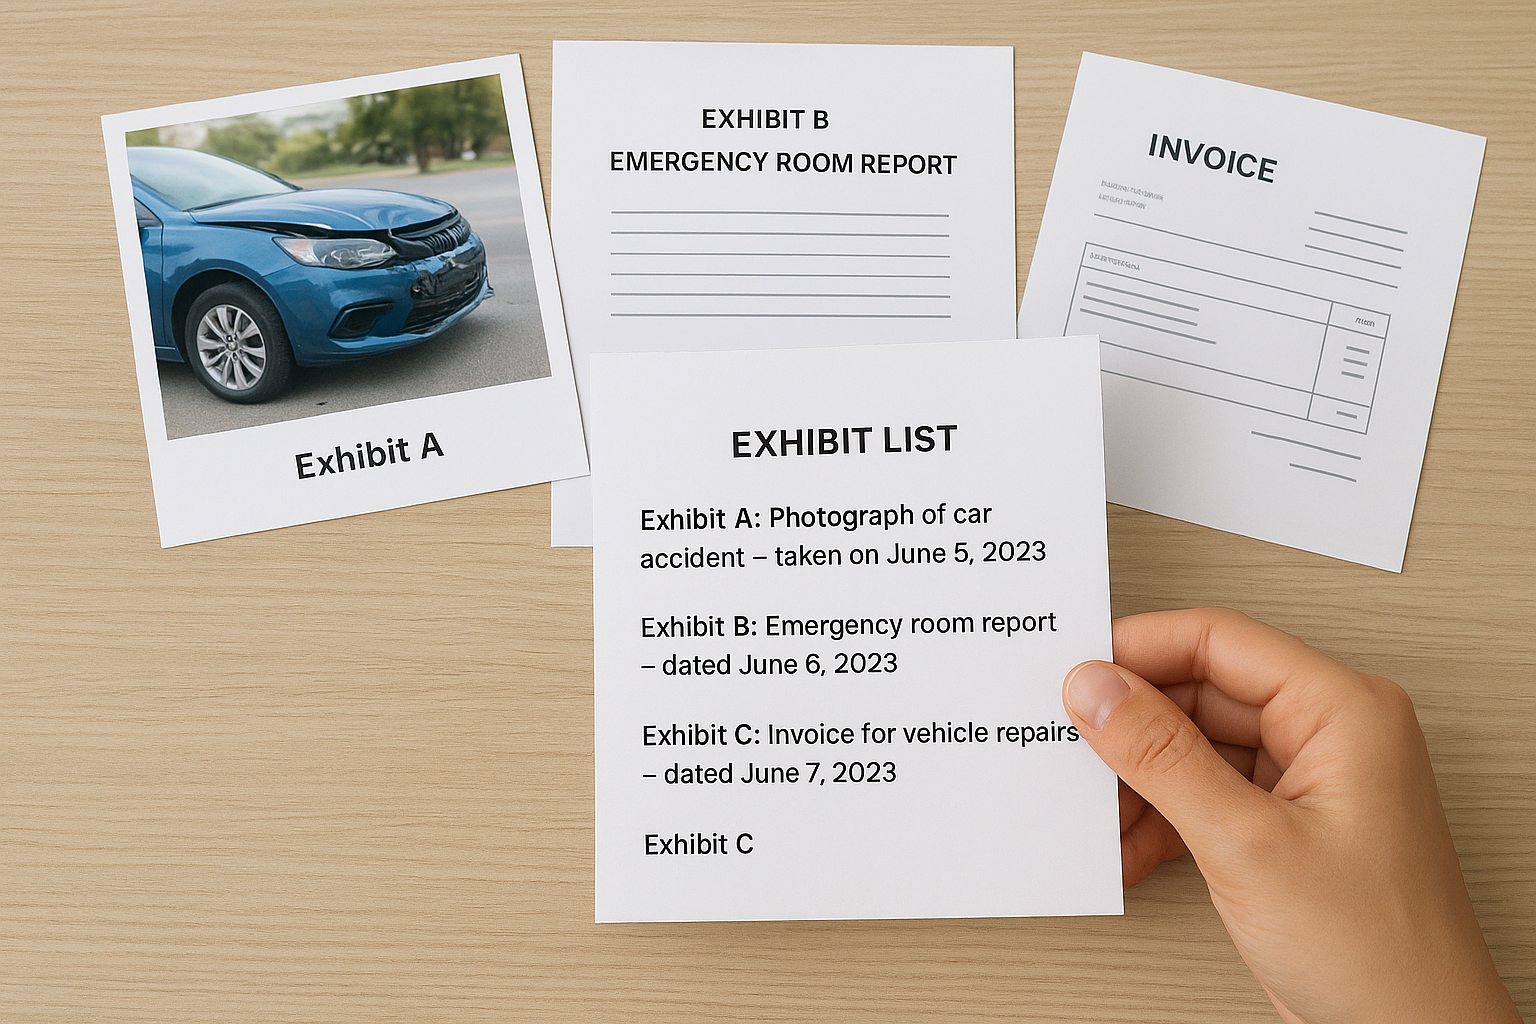
EXHIBIT LIST

Exhibit A: [File name or description] - [What it shows and when it was captured/created]
Exhibit B: [File name or description] - [What it shows and when it was captured/created]
Exhibit C: [File name or description] - [What it shows and when it was captured/created]
Common types of supporting evidence to include are:
- Photographs or video footage taken at the scene, including timestamps
- Medical records or emergency room reports documenting injuries
- Police or incident reports filed at the time of the event
- Receipts or invoices for vehicle repairs, medical treatment, or property damage
- Text messages or emails exchanged around the time of the incident
- Witness contact cards or business cards collected at the scene
How to reference evidence within your statement
Every exhibit you attach needs a direct callout in the body of your statement. Do not leave the reviewer to guess which photo or document supports which part of your account. When you describe a specific detail, name the exhibit right there in the sentence. Write something like: “The damage to the rear bumper is visible in the photograph labeled Exhibit A, taken at the scene at approximately 4:10 p.m.” This approach ties your written observations to physical proof and removes any doubt about what each exhibit is meant to support. Keep every reference specific and factual, and avoid describing an exhibit as proof of something: let the reader draw that conclusion after reviewing it.
Step 7. Finish with truth statement and signature
The final section of your statement is the one that gives everything above it legal standing. Without a closing truth declaration and a proper signature block, your written account is just a document without a verified author. Every element you’ve worked through, from identification details to your incident timeline, carries more weight when you formally attest that the content is accurate to the best of your knowledge and then sign your name to it. This is one of the most important parts of what should be included in a witness statement, and it is the one people most often rush or skip.
Skipping the signature block does not just weaken your statement; it can make the entire document inadmissible in formal proceedings.
Why the closing declaration matters
Your truth statement is a formal attestation of accuracy. It tells the reader that you wrote this account honestly, that the facts are based on your direct personal knowledge, and that you understand the consequences of including false information. In California, a signed declaration submitted in a civil case carries legal weight under California Code of Civil Procedure Section 2015.5, which treats a signed declaration as the equivalent of sworn testimony. Even outside of court, insurers and employers treat a signed, verified statement as a binding representation of the facts you’ve reported.
If you later need to testify in a deposition or at trial, your signed statement becomes the baseline your attorney and opposing counsel will both reference. Any contradiction between what you said in your statement and what you say on the stand will be used to challenge your credibility. Getting the closing block right the first time protects you throughout the entire process.
What to write in your closing block
Keep the language in your closing declaration straightforward and direct. You do not need legal jargon. You need a clear statement that you wrote the account, that it is true to the best of your knowledge, and that you are signing it voluntarily. Below is a ready-to-use template you can copy directly into the end of your statement:
DECLARATION OF TRUTH

I, [Full Legal Name], declare under penalty of perjury under the laws of the
State of California that the foregoing statement is true and correct to the
best of my personal knowledge, information, and belief.

This statement was prepared voluntarily and without coercion.

Signature:    _______________________________
Printed Name: [Full Legal Name]
Date Signed:  [MM/DD/YYYY]
Location:     [City, State]
Sign the statement in ink if you are submitting a physical copy, or use a verified electronic signature if submitting digitally. Keep a signed copy for your own records before you hand anything over to an insurer, attorney, or investigator.
Conclusion
Knowing what should be included in a witness statement gives you a real advantage when a claim or lawsuit depends on a clear factual record. Each step in this guide builds on the last: accurate identification details set the foundation, a tight chronological timeline carries the account forward, and a signed truth declaration locks everything in place. Supporting evidence and exhibit references turn a written account into something that holds up under direct scrutiny from adjusters, attorneys, and judges.
Your statement is only as strong as the effort you put into it now. Waiting too long to document what you saw or experienced lets memory fade and gives the opposing side room to challenge your credibility. Start recording your account within 24 hours, follow the checklist in this guide, and keep a signed copy for yourself.
If you were injured in an accident and need help building a strong case, speak with a personal injury attorney at Steven M. Sweat today.